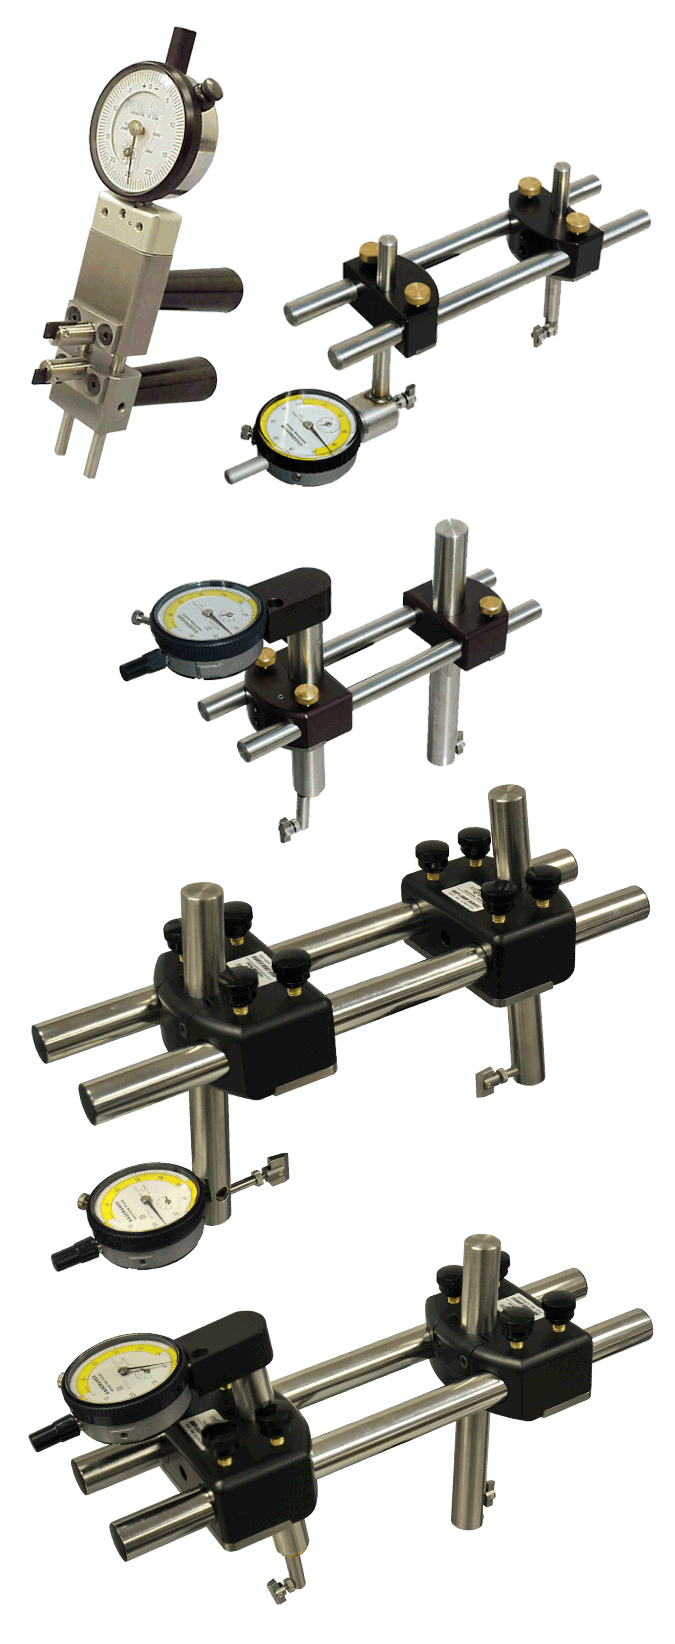
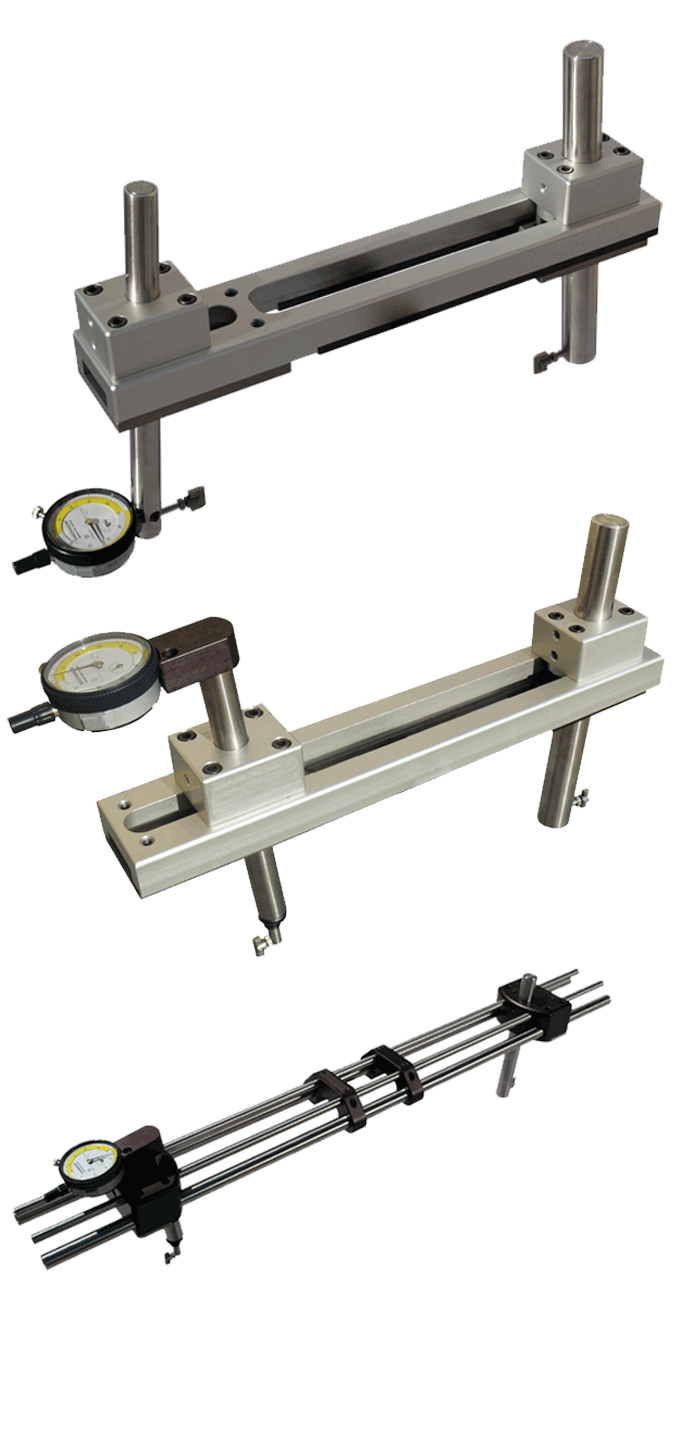
Crest Diameter and Ovality Gages – MRP®


Thirty years ago, Gagemaker introduced the MRP® crest diameter and ovality gage which forever changed the industry. Today, the MRP® series of gages is the industry standard worldwide. Whether you call it Crest Diameter, Root Diameter, or Ball PD, Pitch Diameter governs the strength of the actual thread assembly and ensures API dimensional measurement specs are met. (Check out the new carbon fiber MRP AIR.)
The Gagemaker MRP® crest diameter gages measure the internal and external pitch diameters of tapered threaded connections. Any slight variations in diameter or ovality are immediately detected with these precision gages granting you total control over your quality. These versatile gages easily adjust to measure thread diameters ranging from 1½” – 20”. The ability to inspect a range of diameters with one gage, eliminates the need for a room full of ring or plug gages.
| External/Internal | Range | External Range | Internal Range | Reach | Description | Model |
|---|---|---|---|---|---|---|
| Internal | 1 – 2½” | – | 1 – 2½” | Internal Small Crest/Pitch Diameter gage | MRP-202 | |
| External | 1½” – 4½” | 1 – 2½” | – | 4.4” | External Crest Diameter Gage, 4.4” Reach | MRP-1001 |
| Internal | 1½” – 4½” | 1½” – 4½” | 4.4” | Internal Crest Diameter Gage, 4.4” | MRP-1002 | |
| External/Internal | 1½” – 4½” | 1½” – 4½” | 1½” – 4½” | 4.4” | External/Internal Crest Diameter Gage, 4.4” Reach, External Range 1½” – 4½”, Internal Range 1½” – 4½” | MRP-1003 |
| External/Internal | 1¾” – 4½” | 2⅜” – 4½” | 4.4” | Internal/External Pitch Diameter Gage for Two Step Seal. Upper and lower arms are .740” diameter. Upper arm has standard travel of .150”. Shipped with T125 pts. | MRP-1012-TSS | |
| External/Internal | 1¾” – 4½” | 2⅜” – 4½” | 4.4” | Internal/External Pitch Diameter Gage, Two Step Thread, w/ 1.030” Horseshoe standoff for front and rear measurements. Arms have .740” diameter. Upper arm has extended travel of .350” | MRP-1012-TST |
| External/Internal | External Range | Internal Range | Reach | Description | Model |
|---|---|---|---|---|---|
| External | 2⅜” – 20” | – | 4.4” | External Crest Diameter Gage, 4.4” reach | MRP-2001 |
| External | 2⅜” – 20” | – | 4.4” | External Crest Diameter Gage, 4.4” Reach, Straight Blocks | MRP-2001-S |
| External | 2⅜” – 20” | – | 7” | External Crest Diameter Gage, 7” reach | MRP-2001-7 |
| External | 2⅜” – 20” | – | 10” | External Crest Diameter Gage, 7” reach | MRP-2001-10 |
| Internal | – | 2⅜” – 20” | 4¼” | Internal Crest Diameter Gage, 4¼” reach | MRP-2002 |
| Internal | – | 2⅜” – 20” | 4¼” | Internal Crest Diameter Gage, 4¼” reach, Straight Blocks | MRP-2002-S |
| Internal | – | 3½” – 20” | 7” | Internal Crest Diameter Gage, 7” reach | MRP-2002-7 |
| Internal | – | 3½” – 20” | 10” | Internal Crest Diameter Gage, 10” reach | MRP-2002-10 |
| External/Internal | 2⅜” – 20” | 3½” – 20” | 4¼” | Internal/External Crest Diameter Gage, 4¼” reach | MRP-2003 |
| External/Internal | 2⅜” – 20” | 3½” – 20” | 4¼” | External/Internal Crest Diameter Gage, 2⅜” – 20”, 4¼” reach, Straight Blocks | MRP-2003-S |
| External/Internal | External Range | Internal Range | Reach | Description | Model |
|---|---|---|---|---|---|
| Internal | 8⅝” – 24” | – | 3⅜” | External Crest Diameter Gage, 3⅜” reach | MRP-3001 |
| External | – | 8⅝” – 24” | 3⅜” | Internal Crest Diameter Gage, 3⅜” reach | MRP-3002 |
| External/Internal | 8⅝” – 24” | 8⅝” – 24” | 3⅜” | Internal/External Crest Diameter Gage, 3⅜” reach | MRP-3003 |
| External/Internal | 20” – 36” | 20” – 36” | 3⅜” | Internal/External Crest Diameter Gage, 3⅜” reach | MRP-3004 |
| External/Internal | External Range | Internal Range | Reach | Description | Model |
|---|---|---|---|---|---|
| External/Internal | 2⅞” – 4½” | 1½” – 4½” | 3⅜” | Solid Body External/Internal Crest Gage, 3⅜” Reach | MRP-1500 |
| External | 4½” – 9⅝” | – | 4” | Solid Body External Pitch Diameter Gage, 4” reach | MRP-2511 |
| External | 4½” – 9⅝” | – | 7” | Solid Body External Crest Diameter Gage, 7” reach | MRP-2511-7 |
| Internal | – | 4½” – 9⅝” | 3⅜” | Solid Body Internal Crest Diameter Gage, 3⅜” reach | MRP-2512 |
| Internal | – | 2⅜” – 4½” | 7” | Solid Body Internal Crest Diameter Gage, 7” reach | MRP-2512-7 |
| External/Internal | 4½” – 9⅝” | 4½” – 9⅝” | 3⅜” | Solid Body External/Internal Crest Diameter Gage, 3⅜” reach | MRP-2513 |
| External | 4½” – 13⅜” | – | 4” | Solid Body External Crest Diameter Gage, 4” reach | MRP-2521 |
| Internal | – | 4½” – 13⅜” | 4” | Solid Body Inernal Crest Diameter Gage, 4” reach | MRP-2522 |
| External/Internal | 4½” – 13⅜” | 4½” – 13⅜” | 4” | Solid Body External/Internal Crest Diameter Gage, 4” reach | MRP-2523 |
| External | 8⅝” – 24” | – | 4” | Solid Body External Crest Diameter Gage, 6¼”” reach | MRP-3501 |
| Internal | – | 8⅝” – 24” | 4” | Solid Body Internal Crest Diameter Gage, 6¼”” reach | MRP-3502 |
| External/Internal | 8⅝” – 24” | 8⅝” – 24” | 6¼”” | Solid Body External/Internal Crest Diameter Gage, 6¼”” reach | MRP-3503 |

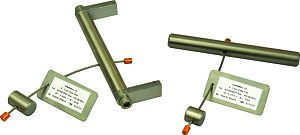
Rod style setting standards are designed to preset MRP® crest diameter gages for accurate inspection of API threaded
connections. Each set of standards consists of two precision ground rods that are ground to lengths in accordance with API Specifications 5B. The rod sets are securely attached together and labeled with the connection size and serial number. The rods set the location of the thread shoe and the distance between shoes for accurate inspection of threaded connections.

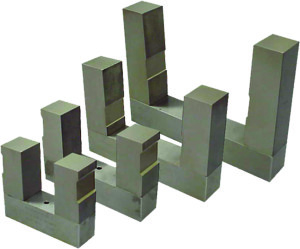
Frame style setting standards are designed to preset the MRP® crest diameter gages for accurate inspection of API threaded connections. These standards consist of a rigid, non-adjustable steel block
precision machined to proper size to tolerances of ±.0003″. Round style standards, smaller than 2⅜”, are available as specials (contact us directly for more information).
| Connection Size | Rod Standard – Box | Rod Standard – Pin | Frame Standard – Box | Frame Standard – Pin |
|---|---|---|---|---|
| 2⅜” | MRP-238EUE-B | MRP-238EUE-P | FSTD-238E-B2 | FSTD-238E-P2 |
| 2⅞” | MRP-278EUE-B | MRP-278EUE-P | FSTD-278E-B2 | FSTD-278E-P2 |
| 3½” | MRP-312EUE-B | MRP-312EUE-P | FSTD-312E-B2 | FSTD-312E-P2 |
| 4” | MRP-4EUE-B | MRP-4EUE-P | FSTD-4E-B2 | FSTD-4E-P2 |
| 4½” | MRP-412EUE-B | MRP-412EUE-P | FSTD-412E-B2 | FSTD-412E-P2 |
| Connection Size | Rod Standard – Box | Rod Standard – Pin | Frame Standard – Box | Frame Standard – Pin |
|---|---|---|---|---|
| 2⅜” | MRP-238NUE-B | MRP-238NUE-P | FSTD-238N-B2 | FSTD-238N-P2 |
| 2⅞” | MRP-278NUE-B | MRP-278NUE-P | FSTD-278N-B2 | FSTD-278N-P2 |
| 3½” | MRP-312NUE-B | MRP-312NUE-P | FSTD-312N-B2 | FSTD-312N-P2 |
| 4” | MRP-4NUE-B | MRP-4NUE-P | FSTD-4N-B2 | FSTD-4N-P2 |
| 4½” | MRP-412NUE-B | MRP-412NUE-P | FSTD-412N-B2 | FSTD-412N-P2 |
| Connection Size | Rod Standard – Box | Rod Standard – Pin | Frame Standard – Box | Frame Standard – Pin |
|---|---|---|---|---|
| 4½” | MRP-412B-B | MRP-412B-P | FSTD-412B-B2 | FSTD-412B-P2 |
| 5” | MRP-5B-B | MRP-5B-P | FSTD-5B-B2 | FSTD-5B-P2 |
| 5½” | MRP-512B-B | MRP-512B-P | FSTD-512B-B2 | FSTD-512B-P2 |
| 6⅝” | MRP-658B-B | MRP-658B-P | FSTD-658B-B2 | FSTD-658B-P2 |
| 7” | MRP-7B-B | MRP-7B-P | FSTD-7B-B2 | FSTD-7B-P2 |
| 7⅝” | MRP-758B-B | MRP-758B-P | FSTD-758B-B2 | FSTD-758B-P2 |
| 8⅝” | MRP-858B-B | MRP-858B-P | FSTD-858B-B2 | FSTD-858B-P2 |
| 9⅝” | MRP-958B-B | MRP-958B-P | FSTD-958B-B2 | FSTD-958B-P2 |
| 10¾” | MRP-1034B-B | MRP-1034B-P | FSTD-1034B-B2 | FSTD-1034B-P2 |
| 11¾” | MRP-1134B-B | MRP-1134B-P | FSTD-1134B-B2 | FSTD-1134B-P2 |
| 13⅜” | MRP-1338B-B | MRP-1338B-P | FSTD-1338B-B2 | FSTD-1338B-P2 |
| 16” | MRP-16B-B | MRP-16B-P | FSTD-16B-B2 | FSTD-16B-P2 |
| 18⅝” | MRP-1858B-B | MRP-1858B-P | FSTD-1858B-B2 | FSTD-1858B-P2 |
| 20” | MRP-20B-B | MRP-20B-P | FSTD-20B-B2 | FSTD-20B-P2 |
| Connection Size | Rod Standard – Box | Rod Standard – Pin | Frame Standard – Box | Frame Standard – Pin |
|---|---|---|---|---|
| 4½” | MRP-412L-B | MRP-412L-P | FSTD-412L-B2 | FSTD-412L-P2 |
| 5” | MRP-5L-B | MRP-5L-P | FSTD-5L-B2 | FSTD-5L-P2 |
| 5½” | MRP-512L-B | MRP-512L-P | FSTD-512L-B2 | FSTD-512L-P2 |
| 6” | MRP-6L-B | MRP-6L-P | FSTD-6L-B2 | FSTD-6L-P2 |
| 6⅝” | MRP-658L-B | MRP-658L-P | FSTD-658L-B2 | FSTD-658L-P2 |
| 7” | MRP-7L-B | MRP-7L-P | FSTD-7L-B2 | FSTD-7L-P2 |
| 7⅝” | MRP-758L-B | MRP-758L-P | FSTD-758L-B2 | FSTD-758L-P2 |
| 8⅝” | MRP-858L-B | MRP-858L-P | FSTD-858L-B2 | FSTD-858L-P2 |
| 9⅝” | MRP-958L-B>P110 or MRP-958L-B<p110< td=””></p110<> | MRP-958L-P | FSTD-958L-B2>P110 or FSTD-958L-B2<p110< td=””></p110<> | FSTD-958L-P2 |
| 20” | MRP-20L-B>JK55 or MRP-20L-B<jk55< td=””></jk55<> | MRP-20L-P | FSTD-20L-B2>JK55 or FSTD-20L-B2<jk55< td=””></jk55<> | FSTD-20L-P2 |
| Connection Size | Rod Standard – Box | Rod Standard – Pin | Frame Standard – Box | Frame Standard – Pin |
|---|---|---|---|---|
| 4½”– 9.50# | MRP-412S-9-B | MRP-412B-9-P | FSTD-412B-9-B2 | FSTD-412B-9-P2 |
| 4½” – Other | MRP-412S-O-B | MRP-412B-O-P | FSTD-412B-O-B2 | FSTD-412B-O-P2 |
| 5” – 11.50# | MRP-5S-B | MRP-5S-P | FSTD-5S-B2 | FSTD-5S-P2 |
| 5” – Other | MRP-5S-O-B | MRP-5S-O-P | FSTD-5S-O-B2 | FSTD-5S-O-P2 |
| 5½” | MRP-512S-B | MRP-512S-P | FSTD-512S-B2 | FSTD-512S-P2 |
| 6⅝” | MRP-658S-B | MRP-658S-P | FSTD-658S-B2 | FSTD-658S-P2 |
| 7” – 17.00# | MRP-7S-17-B | MRP-7S-17-P | FSTD-7S-17-B2 | FSTD-7S-17-P2 |
| 7” – Other | MRP-7S-O-B | MRP-7S-O-P | FSTD-7S-O-B2 | FSTD-7S-O-P2 |
| 7⅝” | MRP-758S-B | MRP-758S-P | FSTD-758S-B2 | FSTD-758S-P2 |
| 7⅝” | MRP-758S-B | MRP-758S-P | FSTD-758S-B2 | FSTD-758S-P2 |
| 8⅝” – 24.00# | MRP-858S-24-B | MRP-858S-24-P | FSTD-858S-24-B2 | FSTD-858S-24-P2 |
| 8⅝” – Other | MRP-858S-O-B | MRP-858S-O-P | FSTD-858S-O-B2 | FSTD-858S-O-P2 |
| 9⅝” | MRP-958S-B>P110 or MRP-958S-B<p110< td=””></p110<> | MRP-958S-P | FSTD-958S-B2>P110 or FSTD-958S-B2<p110< td=””></p110<> | FSTD-958S-P2 |
| 10¾” – 32.75# | MRP-1034S-32-B | MRP-1034S-32-P | FSTD-1034S-32-B2 | FSTD-1034S-32-P2 |
| 10¾” – Other | MRP-1034S-O-B>P110 or MRP-1034S-O-B<p110< td=””></p110<> | MRP-1034S-O-P | FSTD-1034S-O-B2>P110 or FSTD-1034S-O-B2<p110< td=””></p110<> | FSTD-1034S-O-P2 |
| 11¾” | MRP-1134S-B>P110 or MRP-1134S-B<p110< td=””></p110<> | MRP-1134S-P | FSTD-1134S -B2>P110 or FSTD-1134S-B2<p110< td=””></p110<> | FSTD-1134S-P2 |
| 13⅜” | MRP-1338S-B>P110 or MRP-1338S-B<p110< td=””></p110<> | MRP-1338S-P | FSTD-1338S-B2>P110 or FSTD-1338S-B2<p110< td=””></p110<> | FSTD-1338S-P2 |
| 16” | MRP-16S-B | MRP-16S-P | FSTD-16S-B2 | FSTD-16S-P2 |
| 18⅝” | MRP-1858S-B | MRP-1858S-P | FSTD-1858S-B2 | FSTD-1858S-P2 |
| 20” | MRP-20S-B>JK55 or MRP-20S-B<jk55< td=””></jk55<> | MRP-20S-P | FSTD-20S-B2>JK55 or FSTD-20S-B2<jk55< td=””></jk55<> | FSTD-20S-P2 |
The step style setting standards are designed to preset several models of the MRP® Crest Diameter gage series for accurate inspection of API threaded connections. These standards consist of a rigid, non-adjustable steel block precision machined to proper size to tolerances of ±.0003”.
| Connection | Connection Size | Thread Form | TPI | TPF | Description | Box Model | Pin Model |
|---|---|---|---|---|---|---|---|
| 8 Round & 10 Round | 8 Round & 10 Round | EUE | 8 & 10 | ¾” | MRP Step Style Standard for EUE threads | SSTD-B-EUE | SSTD-P-EUE |
| 8 Round & 10 Round | 8 Round & 10 Round | NUE | 8 & 10 | ¾” | MRP Step Style Standard for NUE threads | SSTD-B-NUE | SSTD-P-NUE |
| 8 Round | 4½” – 6⅝” | STC | 8 | ¾” | MRP Step Style Standard for 4½” – 6⅝” STC threads | SSTD-B-STC | SSTD-P-STC |
| 8 Round | 7” – 8⅝” | STC | 8 | ¾” | MRP Step Style Standard for 7” – 8⅝” STC threads | SSTD-B-STC | SSTD-P-STC |
| 8 Round | 4½” – 9⅝” | LTC | 8 | ¾” | MRP Step Style Standard for 4½” – 9⅝” LTC threads | SSTD-B-LTC | SSTD-P-LTC |
| 8 & 11½ Pitch “V” Threads | 2½” – 10” | Line Pipe & NPT | 8 & 11½ | ¾” | MRP Step Style Standard for 2½” – 10” Line Pipe | SSTD-B-LP | SSTD-P-LP |
| ¾” Buttress | 4½” – 7⅝” | Buttress | 5 | ¾” | MRP Step Style Standard for ¾” TPF Buttress, 4½” – 7⅝” | SSTD-B-BTC1 | SSTD-P-BTC1 |
| ¾” Buttress | 8⅝” – 13⅜” | Buttress | 5 | ¾” | MRP Step Style Standard for ¾” TPF Buttress, 8⅝” – 13⅜” | SSTD-B-BTC2 | SSTD-P-BTC2 |
| Part Type | Gage | Length | Description | Model |
|---|---|---|---|---|
| Shoe | MRP-202 | .500” | External Thread Shoe, ½” long for MRP-202 | MRP-.500E |
| Shoe | All MRP® models | .625” | External Thread Shoe, ⅝” long | MRP-.625E |
| Shoe | All MRP® models | .625” | Internal Thread Shoe, ⅝” long | MRP-.625I |
| Shoe | All MRP® models | .750” | External Thread Shoe, ¾” long | MRP-.750 |
| Shoe | All MRP® models | .875” | Thread Shoe, ⅞” long | MRP-.875 |
| Shoe | All MRP® models | 1.000” | Thread Shoe, 1.00” long | MRP-1.00 |
| Shoe | All MRP® models | 1.500” | Thread Shoe, 1.50” long | MRP-1.50 |
| Shoe | All MRP® models | 2.250” | Thread Shoe, 2.25” long | MRP-2.25 |
| Shoe | All MRP® models | 20 mm | Metric Thread Shoe, 20 mm long | MRP-20mm |
| Setting Stand | All MRP® models | – | MRP® gage setting stand | MRP-GSS |
| Part Type | Corresponding Gage(s) | Resolution | Description |
|---|---|---|---|
| Block Set | MRP-1000 Series | MRP-1000 series block set for .375″ arms | MRP-10BL |
| Lower Arm | MRP-1000 Series | MRP-1000 series lower arm, .375″ diameter | MRP-10LA |
| Upper Arm | MRP-1000 Series | MRP-1000 series upper arm, .375″ diameter | MRP-10UA |
| Knob | MRP-1000 Series | MRP-1000 knob, short | MRP-10KB-S |
| Block Set | MRP-1000 Series | MRP-1000 series block set for 0.5” diameter arms | MRP-10SBL |
| Knob | MRP-1000 Series | MRP-1000 knob, long | MRP-10KB-L |
| Spring Plunger | MRP-1000 Series | MRP-1000 series spring plunger | MRP-10SP |
| Wear Pad Set | MRP-1000 Series | MRP-1000 series wear pad set | MRP-10WP |
| Lower Arm | MRP-1000 Series | MRP-1000 series lower arm, .5″ diameter | MRP-11LA |
| Upper Arm | MRP-1000 Series | MRP-1000 series upper arm for external/pin connections, .5″ diameter | MRP-11UA |
| Upper Arm | MRP-1000 Series | MRP-1000 series upper arm for internal/box connections, .5″ diameter | MRP-12UA |
| Block Set | MRP-2000 Series | MRP-2000 series block set | MRP-20BL |
| Arm Clamp | MRP-2000 Series | MRP-2000 series arm clamp | MRP-20BL |
| Spring Plunger | MRP-2000 Series | MRP-2000 series spring plunger | MRP-20SP |
| Knob | MRP-2000 Series | MRP-2000 series knob | MRP-20KB |
| Wear Pad Set | MRP-2000 Series | MRP-2000 wear pad set | MRP-20WP |
| Wear Pad Set | MRP-2000 Series | MRP-2000 extended wear pad set | MRP-20WPEX |
| Rail | MRP-2000 Series | MRP-2000 series 12″ cross rail | MRP-RAIL-12 |
| Rail | MRP-2000 Series | MRP-2000 series 18″ cross rail | MRP-RAIL-18 |
| Rail | MRP-2000 Series | MRP-2000 series 24″ cross rail | MRP-RAIL-24 |
| Wear Pad Set | MRP-3000 Series | MRP-3000 wear pad set | MRP-30WP |
| Wear Pad Set | MRP-3000 Series | MRP-3000 extended wear pad set | MRP-30WPEX |
