Gage Setting and Part Measurement Systems – MIC TRAC 3000

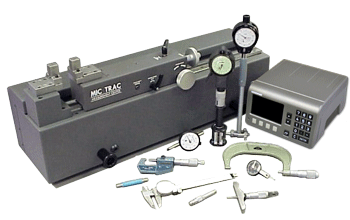
Employing a versatile bench mounted length measuring system allows you to measure parts, calibrate hand held gages, and preset indicator style gages. The Gagemaker Shop Floor MIC TRAC™ Gage Setting and Part Measurement System (MT-3000 Series) sets or zeros most gages with the standard resolution of .00005″, accuracies ranging from ±.0001″ to ±.0004″ (traceable to the NIST) and the digital read out is CE approved. The cost effective Force-Lok™ feature improves repeatability from operator to operator and is well suited for a variety of environments including the shop floor.
The MIC TRAC™ System is an electronic, adjustable calibration and measurement center that will inspect parts, preset indicator style gages, and calibrate a variety of hand held inspection gages. The MIC TRAC 3000 System (MT-3000) is suited for use nearly anywhere, on a shop floor to a calibration lab.
The MIC TRAC™ System contains receiver pads, which are precision ground in matched sets, and used as parallel surfaces for measuring or holding fixtures. The MT-3000’s digital readout (DRO) displays measurement readings in inch or metric.*
The MT-3000 measurement system includes the base unit, which houses the optical scale and provides the system’s precision measuring capability. The base unit may include an optional Force-Lok™ feature that provides a constant measurement force, which improves repeatability from operator to operator. A computer may be substituted for the system’s digital readout unit (DRO). This computer comes pre-installed with our CERTIFI™ Gage Calibration software and our TDWin™ Thread Engineering software.

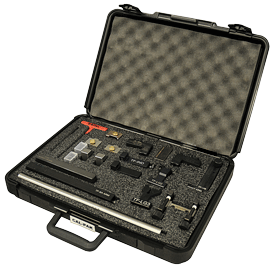
For gage calibration, the optional CAL-PAK fixture package can be included with any MIC TRAC™ system. The CAL-PAK is an assortment of fixtures that attach to the base unit for holding gages securely during the calibration process. Proper positioning of the gage improves the accuracy of the calibration and provides more consistent results.
To help you with your decision process, we’ve created a quick and easy Return on Investment Calculator based on one of our most popular MT-3000 calibration bundles (a MT-3012F-50-USBC and a CAL-PAK fixture set) and the number of calibrations (each instance of each gage) you do per year below.
Calibrate Hand Held Gages and Preset Indicator Style Gages
- Delivers high accuracy in a variety of environments including the shop floor
- Serves as a setting master for gages produced by various manufacturers
- Provides fast, accurate dimensional part measurements
- Ensures measurement repeatability from operator to operator using force lok accessory
- Calibrates hand-held gages in-house for faster turnaround
- Accuracies to .0001″ (2.54µ) traceable to the NIST
- Resolution of .00005″
- State of the Art Assembly of Internal Glass Scale, Precision Linear Bearing and a Set of Precisely Lapped Measuring Blocks
- Electronic Adjustable Measurement Master with Ranges from 0″ to 12″ (Units Up to 60″ Ranges)
- Digital Readout Provides Measurement Reading in Inch or Metric
- Durable Construction Allows Use in Practically Any Environment
- Unique Force Lok feature available if you plan to measure parts or calibrate certain standards. It improves repeatability from operator to operator
Gage Setting and Part Measurement Systems
These packages features the MIC TRAC as a multi-use gage setting system. The system sets or zeros most gages with the use of interchangeable anvils or blocks. Standard resolution of base unit is .0005″. Accurate range from ±.0001″ to ±.0004″. The Digital Read Out (DRO) is CE approved. All MT-3000 Series include one set of TF-PL blocks and a shipping carton. Larger ranges are available, please contact customer service for more information.
| External Range | Internal Range | Accuracy | Resolution | Description | Model |
|---|---|---|---|---|---|
| 1½” – 13½” (38.1 mm – 342.9 mm) |
0” – 12” (0 mm – 304.8 mm) |
±.0001” | .00005” | MIC TRAC™ 12″ Base Unit with DRO | MT-3012-50 |
| 1½” – 25½” (38.1 mm – 647.7 mm) |
0” – 24” (0 mm – 609.6 mm) |
±.0002” | .00005” | MIC TRAC™ 24″ Base Unit with DRO | MT-3024-50 |
| 1½” – 37½” (38.1 mm – 952.5 mm) |
0” – 36” (0 mm – 914.4 mm) |
±.0003” | .00005” | MIC TRAC™ 36″ Base Unit with DRO | MT-3036-50 |
| 1½” – 49½” (38.1 mm – 1257.3 mm) |
0” – 48” (0 mm – 1219.2 mm) |
±.0004” | .00005” | MIC TRAC™ 48″ Base Unit with DRO | MT-3048-50 |
| External Range | Internal Range | Resolution | Accuracy | Description | Model |
|---|---|---|---|---|---|
| 1½” – 13½” (38.1 mm – 342.9 mm) |
0” – 12” (0 mm – 304.8 mm) |
.00005” | ±.0001” | MIC TRAC™ 12″ Force-Lok Unit with DRO | MT-3012F-50 |
| 1½” – 25½” (38.1 mm – 647.7 mm) |
0” – 24” (0 mm – 609.6 mm) |
.00005” | ±.0002” | MIC TRAC™ 24″ Force-Lok Unit with DRO | MT-3024F-50 |
| 1½” – 37½” (38.1 mm – 952.5 mm) |
0” – 36” (0 mm – 914.4 mm) |
.00005” | ±.0003” | MIC TRAC™ 36″ Force-Lok Unit with DRO | MT-3036F-50 |
| 1½” – 49½” (38.1 mm – 1257.3 mm) |
0” – 48” (0 mm – 1219.2 mm) |
.00005” | ±.0004” | MIC TRAC™ 48″ Force-Lok Unit with DRO | MT-3048F-50 |
| External Range | Internal Range | Resolution | Accuracy | Description | Model |
|---|---|---|---|---|---|
| 1½” – 13½” (38.1 mm – 342.9 mm) |
0” – 12” (0 mm – 304.8 mm) |
.00005” | ±.0001” | MIC TRAC™ 12″ Force-Lok Unit with a Computer and MT-4-USB | MT-3012F-50-USBC |
| 1½” – 25½” (38.1 mm – 647.7 mm) |
0” – 24” (0 mm – 609.6 mm) |
.00005” | ±.0002” | MIC TRAC™ 24″ Force-Lok Unit with a Computer and MT-4-USB | MT-3024F-50-USBC |
| 1½” – 37½” (38.1 mm – 952.5 mm) |
0” – 36” (0 mm – 914.4 mm) |
.00005” | ±.0003” | MIC TRAC™ 36″ Force-Lok Unit with a Computer and MT-4-USB | MT-3036F-50-USBC |
| 1½” – 49½” (38.1 mm – 1257.3 mm) |
0” – 48” (0 mm – 1219.2 mm) |
.00005” | ±.0004” | MIC TRAC™ 48″ Force-Lok Unit with a Computer and MT-4-USB | MT-3048F-50-USBC |
| External Range | Internal Range | Accuracy | Resolution | Description | Model |
|---|---|---|---|---|---|
| 1½” – 13½” (38.1 mm – 342.9 mm) |
0” – 12” (0 mm – 304.8 mm) |
±.00005” | .00001” | MIC TRAC™ 12″ High Resolution Force-Lok Unit with a Computer and MT-4-USB | MT-3012F-10-USBC |
| 1½” – 25½” (38.1 mm – 647.7 mm) |
0” – 24” (0 mm – 609.6 mm) |
±.00010” | .00001” | MIC TRAC™ 24″ High Resolution Force-Lok Unit with a Computer and MT-4-USB | MT-3024F-10-USBC |
| 1½” – 37½” (38.1 mm – 952.5 mm) |
0” – 36” (0 mm – 914.4 mm) |
±.00015” | .00001” | MIC TRAC™ 36″ High Resolution Force-Lok Unit with a Computer and MT-4-USB | MT-3036F-10-USBC |
| 1½” – 49½” (38.1 mm – 1257.3 mm) |
0” – 48” (0 mm – 1219.2 mm) |
±.00020” | .00001” | MIC TRAC™ 48″ High Resolution Force-Lok Unit with a Computer and MT-4-USB | MT-3048F-10-USBC |
| 1½” – 61½” (38.1 mm – 1562.1 mm) |
0” – 60” (0 mm – 1524 mm) |
±.00025” | .00001” | MIC TRAC™ 60″ High Resolution Force-Lok Unit with a Computer and MT-4-USB | MT-3060F-10-USBC |
| Connection Type/Form | Type | Gage | Description | Model |
|---|---|---|---|---|
| Premium Ring Grooves & Seals | Shallow Tapered Cylinder Setting Blocks | BX-1000 Series, Ball Mics, or Pin Nose Gages | Tapered Setting Blocks 10° half angle, set of 2 | TF-10 |
| Premium Ring Grooves & Seals | Shallow Tapered Cylinder Setting Blocks | BX-1000 Series, Ball Mics, or Pin Nose Gages | Tapered Setting Blocks 15° half angle, set of 2 | TF-15 |
| Premium Ring Grooves & Seals | Shallow Tapered Cylinder Setting Blocks | BX-1000 Series, Ball Mics, or Pin Nose Gages | Tapered Setting Blocks 20° half angle, set of 2 | TF-20 |
| Premium Ring Grooves & Seals | Shallow Tapered Cylinder Setting Blocks | BX-1000 Series, Ball Mics, or Pin Nose Gages | Tapered Setting Blocks 30° half angle, set of 2 | TF-30 |
| Premium Ring Grooves & Seals | Shallow Tapered Cylinder Setting Blocks | BX-1000 Series, Ball Mics, or Pin Nose Gages | Tapered Setting Blocks 40° half angle, set of 2 | TF-40 |
| – | General Purpose Block | Various | Flat Face Setting Blocks, 1.000” outside diameter | TF-.5F |
| – | General Purpose Block | Various | Universal flat face setting/ measuring blocks, 1.500” outside diameter | TF-1F |
| – | General Purpose Block | Various | Flat Face Setting Blocks, No taper (supplied with MIC TRAC™) | TF-PL |
| Ring Grooves & Flanges | API 6A Ring Groove & Special Flange Groove Setting Blocks | BX-1000 Series | 23° BXR Ring Groove Diameter/Width Setting Blocks, used with BX-1000 gages, set of 2 | TF-BX |
| 60° “V” threads/UN Series thread, 3-5 pitch | Straight Thread Gage Setting Block | Pitch diameter (straight) and functional size gages | 3-5 pitch 60° “V” thread (UN Series) setting blocks, set of 2 | TF-1V |
